public override void WebDeleting(SPWebEventProperties properties)
{
properties.Status = SPEventReceiverStatus.CancelWithError/CancelwithredirectUrl;
properties.ErrorMessage = "This site cannot be deleted; Contact your administrator";
properties.Cancel = true;
}
public override void ItemDeleting(SPItemEventProperties properties)
       {
           try
           {
               base.ItemDeleting(properties);
               StringBuilder strMessage = new StringBuilder();
               using (SPSite oSite = new SPSite(properties.SiteId))
               {
                   using (SPWeb oWeb = oSite.OpenWeb(properties.Web.ID))
                   {
                       SPList list = oWeb.Lists.TryGetList("TheTeam");
                       if (properties.List.ID == list.ID)
                       {
                           //<summery>
                           // here condition defines to the listitem is not null nad employeename not null and employeename is av2 then it will be effect to list item.ope error page
                           //</summery>
                           if (properties.ListItem != null && properties.ListItem["employeename"] != null && properties.ListItem["employeename"].ToString().Equals("av2"))
                           {
                               properties.Cancel = true;
                               properties.Status = SPEventReceiverStatus.CancelWithRedirectUrl;
                               properties.ErrorMessage = "its unable to deleting please contact your administrator";
                               //properties.RedirectUrl = oSite.Url + "/_layouts/Seal/CustomErrorPage.aspx";
                           }
                       }
                   }
               }

           }
           catch (Exception e)
           {
               //properties.Status = SPEventReceiverStatus.CancelWithError;
               //properties.ErrorMessage = "its unable to deleting please contact your administrator";
               //properties.Cancel = true;
           }
       }
public override void ItemDeleted(SPItemEventProperties properties)
{
try
{
base.ItemDeleted(properties);
StringBuilder strMessage = new StringBuilder();
using (SPSite oSite = new SPSite(properties.SiteId))
{
using (SPWeb oWeb = oSite.OpenWeb(properties.Web.ID))
{
SPList list = oWeb.Lists.TryGetList("TheTeam2");
SPListItemCollection coll=list.Items;
SPListItem item=coll.Add();
if (properties.List.ID == list.ID)
{
//<summery>
// here condition defines to the listitem is not null nad employeename not null and employeename is av2 then it will be effect to list item.ope error page
//</summery>
item["mgr"]="venu";
item["Companyname"] = "HP";
item.Update();
}
}
}
}
catch (Exception e)
{
//properties.Status = SPEventReceiverStatus.CancelWithError;
//properties.ErrorMessage = "its unable to deleting please contact your administrator";
//properties.Cancel = true;
}
}
SharePoint 2010
The object model has been extended in various places, and this is one of the most welcome changes for me and a lot of my fellow peers doing daily SharePoint development.
So, in this article I will walk you through the news with Event Receivers in SP 2010 in regards to creating custom Error Pages for your users.
Creating an Event Receiver in SharePoint 2010 with a Custom Error Page
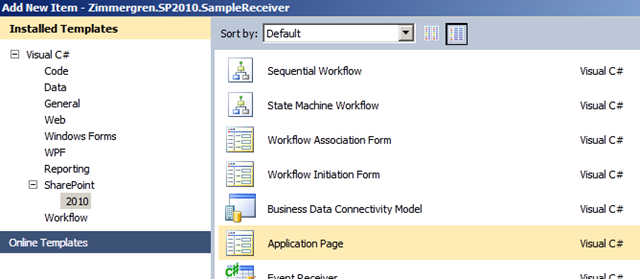
Using Visual Studio 2010, choose the new template called "Event Receiver" like so:


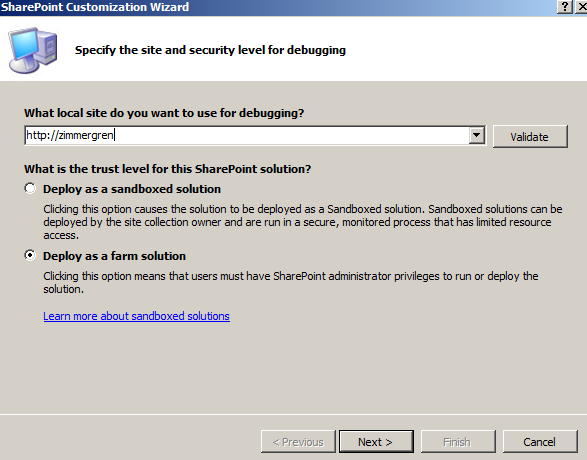
Choose if you want this to be a Farm Solution or a Sandboxed Solution. Then click next:

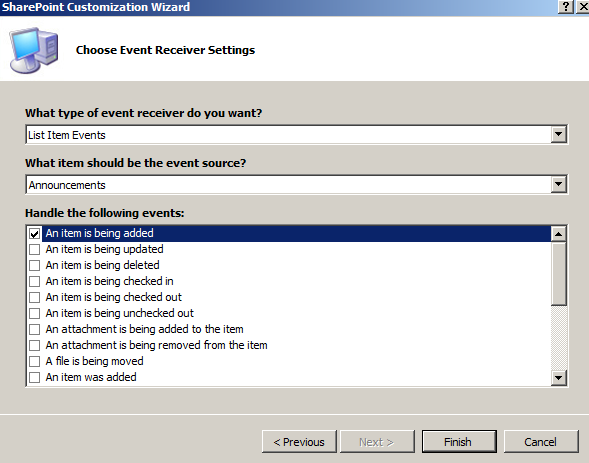
Finally, choose the Type of receiver you want to create, what event you would like to hook up and to what type. I chose "List Item Events", "Announcements" and "An item is being added":

Click next and let Visual Studio 2010 work it’s magic.
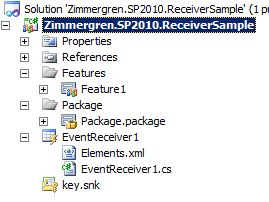
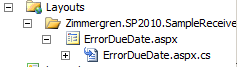
You’re presented with the following project structure that is created for us:

I will not dig deep on how and why the structure of the project looks the way it does now – it will be covered in another article.
1. Adding some basic logic for your Event Receiver
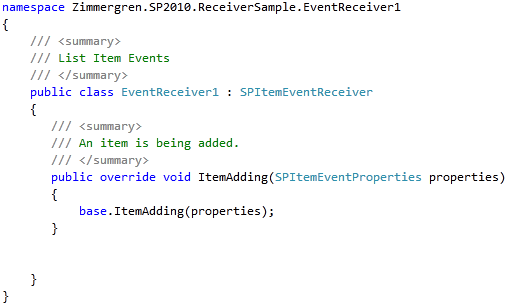
In the EventReceiver1.cs file that you’re presented with, you can quite easily add any code you want – and some code has already been added so you don’t have to!
The code looks like this out of the box:
Now, what I want to do in order to make sure my event receiver works – is to simply add some dummy-code and have it tested!
Add the following code to your ItemAdding-method:

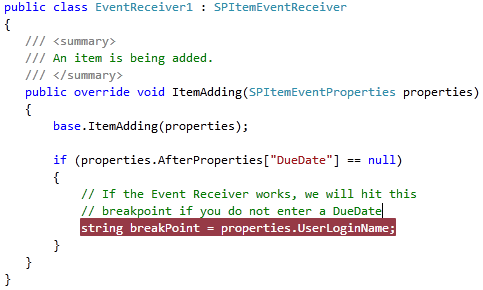
All we do here is check our item that is being added makes a condition to see if the DueDate property is set. The breakpoint is simply added because you easily should see that your code executes and works as expected.
2. Press the Holy Button (F5)
By pressing F5, Visual Studio will take care of the build, packaging and deployment of your Event Receiver. For more details on the actual F5-experience, I encourage you to read MSDN, SDK and all the blogs out there.
You are presented with a web page (VS 2010 launches IE for you as well), where you now can easily test your Event Receiver.
In our case, when adding a new Announcement, we should automatically check the DueDate property. Currently we don’t cancel the event or do anything else – let’s leave that to your imagination.
Cancelling an Event in SharePoint 2010
So – now that we’ve got a very basic Event Receiver in SharePoint 2010, we should add that Custom Error Page we talked about.
- Start by adding a New Item to your project of type Application Page:
- Visual Studio 2010 will now automatically add a mapped folder called "Layouts" which is mapping to the _layouts folder in the SharePointRoot (14-folder):
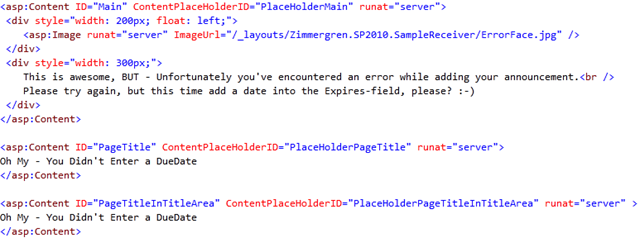
- Edit the ErrorDueDate.aspx file to add some rich HTML:
Note that I am referring to an image as well. I just popped that into the same Layouts-folder that was created for my Event Receiver project.
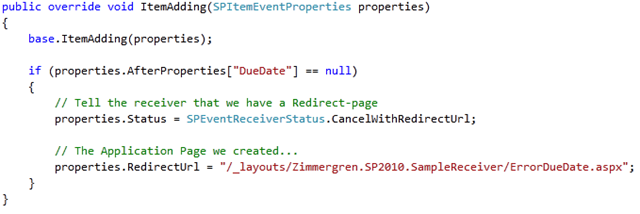
- Edit your EventReceiver1.cs file and add the current logic:
This will now cancel the event if the DueDate field is empty, and show the user a custom error page that you designed yourself. - Hit F5 and let Visual Studio 2010 work it’s magic again
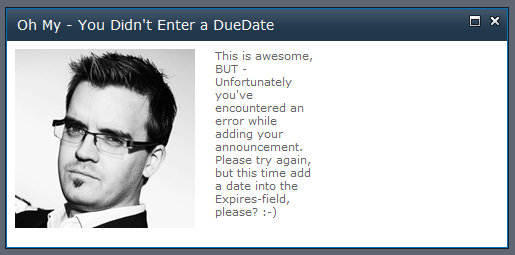
- Try it out by adding a new Announcement without adding a DueDate:
- You should now be presented with the following dialog:


No comments:
Post a Comment